
Spooky Halloween Chocolate Cake Pops Recipe
October 24, 2023
Halloween, the spookiest time of the year, calls for some deliciously eerie treats that are both fun to make and delightful to devour. What makes it more festive? Chocolate of course! Here's a fun recipe.
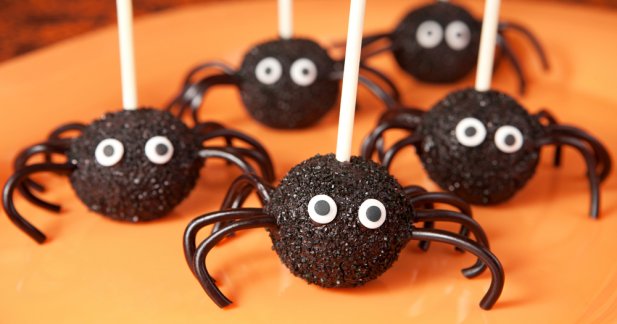
Among the vast array of Halloween desserts, one that never fails to captivate the taste buds and ignite the Halloween spirit is the Spooky Halloween Chocolate Cake Pop. These delectable, bite-sized delights are not only visually appealing but also incredibly easy to make.
Here's a simple and irresistible Spooky Halloween Chocolate Cake Pops recipe that will become the star of your Halloween celebrations.
|
Spooky Halloween Chocolate Cake Pops Recipe What you need: For the Chocolate Cake:
For the Cake Pops:
What to do: Bake the Chocolate Cake: Preheat your oven according to the cake mix instructions. Then, prepare the cake mix following the package instructions, which typically involve mixing the cake mix, eggs, oil, and water in a bowl until smooth. Bake the cake in a greased and floured pan according to the recommended time on the cake mix box. Once the cake is baked and cooled, crumble it into a large mixing bowl. Mix with Frosting: Add the chocolate frosting to the crumbled cake. Mix it thoroughly until the mixture has a moist, dough-like consistency. If the mixture feels too dry, add a little more frosting; if it's too wet, you can add more crumbled cake. Shape into Balls: Take small portions of the mixture and roll them into bite-sized balls. These will be the cake pops. Ensure they are evenly sized for uniform cake pops. Insert Lollipop Sticks: Melt a small amount of candy melts and dip the tip of each lollipop stick into the melted candy. Then, gently insert the coated end of the stick into each cake ball, about halfway through. Place the cake pops on a tray or baking sheet and refrigerate for about 20-30 minutes to set. Decorate: Melt the candy melts according to the package instructions. Then, dip each cake pop into the melted candy coating, allowing any excess to drip off. While the candy coating is still wet, decorate the cake pops with Halloween-themed sprinkles, edible googly eyes, and any other spooky decorations you like. And use black icing gel to draw spooky faces or designs on the cake pops. Let Them Set: Place the decorated cake pops into a Styrofoam block to allow them to set completely. Enjoy: And that’s it! Your Spooky Halloween Chocolate Cake Pops are ready to enjoy! Arrange them on a spooky-themed platter and watch them disappear at your Halloween party. |
These Spooky Halloween Chocolate Cake Pops are not only a delicious treat but also a fantastic activity to get into the Halloween spirit.
Whether you're making them for a party or just for a fun family activity, these cake pops are sure to be a hit.
So, gather your ingredients, unleash your creativity, and create these delightful Halloween-themed treats that will leave everyone enchanted and craving for more. Happy Halloween! 🎃👻
Have some extra melted chocolate? Try making these chocolate covered raisins!
Making your own Spooky Halloween Chocolate Cake Pops on your next Halloween party? Don't forget to share it on social media and tag me on Facebook and Twitter so I can check them out!
What recipe do you want to learn next? Comment down below and let’s learn together!
 Get "Recipes Of CUO" - FREE!
You'll get 52 chocolate recipes you can make to impress your friends (and a bonus recipe that you put on your face instead of in your mouth). The Recipes Of CUO ebook represents some of the favorite recipes we have published over the years.
CLICK HERE to get a FREE copy!

- How to Build a Chocolate Charcuterie Board - July 21, 2026
- Easy Homemade Chocolate Mango Tart Recipe - July 14, 2026
- Why World Chocolate Day Is Worth Celebrating - July 7, 2026